
A good starter master bus chain
I helped a mentee who works in Ableton design a good starter master bus chain the other day — and I thought I would share that here also! “Where on earth do I even start with my master bus” is an extremely common question, I think.
Note that while this uses Ableton screenshots, the concepts are 100% transferrable and basic, and you can replicate this in any DAW with the built-in plugins.
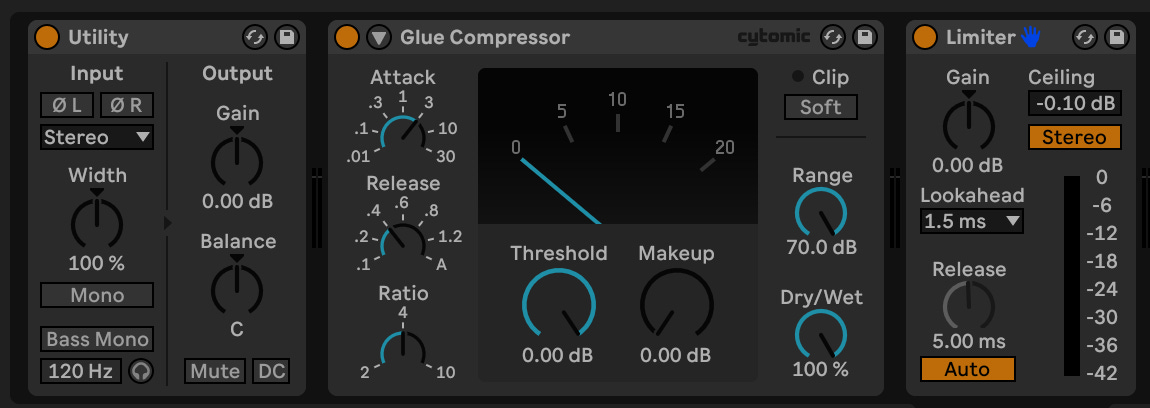
So simple! Here’s what’s going on, in order:
Utility plugin. This is to give you a gain stage at the top of your master bus. You know how sometimes your mix sounds great but it’s just kind of quiet? You ever have that happen? This is a one-knob place where you can turn it up to get it in the right zone for the subsequent compression and limiting. Just turn the Gain knob!
In Pro Tools, this is the Trim plugin … in Logic, this is the Gain plugin … every DAW has one, just google it.Glue Compressor. In Ableton, this is helpfully named the name of the thing you want it to do! In Logic, you can use the built-in Compressor plugin on the Vintage VCA setting, which, like the Glue Compressor, is an emulation of the SSL 4000 master bus compressor, which is That Sound. That lovely, gluey, dynamic, interactive sound! If you’re in Pro Tools, you’ll have to buy something — I recommend this1.
Brickwall limiter. This should always be the last thing on your master bus that affects the sound (but metering plugins go after the limiter, so that the meters take the limiting inti account!).
And here are usage notes:
Utility: as noted, this is for the Gain knob, in case the loudness needs a boost at the top of the chain to be in the right range for the dynamics plugins.
Bus compressor: here are some good middle-of-the-road settings for modern music:
attack: 3 ms (medium)
release: 0.4 s (400 ms) (medium)2
ratio: 4:1 (sometimes 2:1 can be good too, for gentler material)
threshold: adjust this until you're getting 3-4 dB of compression on the loudest parts of your song*
* if you’re having to put the threshold on your bus compressor much lower than -6 dB to get the desired amount of compression, then use the Gain plugin to add enough gain to set it into the right spot.Limiter: ceiling = -0.1 dB, release = 5 ms. Quick and hopefully pretty transparent! Get the amount of compression you want first. Then use more Gain to push the level out of the compressor into the limiter as need be, to get the amount of limiting you need to achieve the overall loudness you’re going for.
(You can use the bus compressor’s Makeup Gain knob for this; that’s what it’s for. You can also use another Utility/Gain/Trim plugin in between the compressor and the limiter.)
If it were me (and it is!), I would put a loudness-measuring plugin after the limiter, so that you can see as you’re working how loud your song is (here’s a free one, and here’s how to use it). That’s how you know how hard to hit the limiter! Without reliable and precise metering, you’re flying blind. Yes, this is art, but there’s also a little science.
I recommend targeting -8 LUFS (Integrated) for songs that go pretty consistently all the way through. That’s loud! That will shake out any problems with your mix that you weren’t aware of. Everyone’s mix sounds good until it hits the limiter; if you work like this, and work through this, your mix will sound good after it hits the limiter. Which is the goal; indeed, there is no other goal; your mix is definitely hitting a limiter.
LUFS (Integrated) measures the average loudness over the entire song, so if your song has extended quiet parts, maybe its LUFS (I) would only be -10 or something. Use your ears and compare to your other work to make sure it’s sitting perceptually where it needs to be.
Control; I’m here — jamie
This plugin is currently on a steep sale, and is the master bus compressor on 98% of the mixes I do.
On most SSL 4000 bus compressor emulations, the release time in this range would be 300ms, not 400ms, and that’s actually my preference; the Ableton one just happens to be a little different.